ONNX Model Deployment in MQL5: Step-by-Step Guide

ONNX Model Deployment in MQL5: Step-by-Step Guide
ONNX makes it easy to bring AI models from Python frameworks like TensorFlow or PyTorch into MetaTrader 5 (MT5). This guide explains how to prepare data, train models, convert them to ONNX format, and integrate them into MT5 for trading. The process includes:
- Data Preparation: Collect and normalize market data using Python and save it in formats compatible with MT5.
- Model Training: Use Python frameworks to train models and export them to ONNX format.
- Integration: Incorporate ONNX models into MT5 using functions like
OnnxCreateandOnnxRun. - Testing: Validate predictions in MT5 and optimize configurations for performance.
This approach enables real-time AI-driven trading strategies in MT5, leveraging ONNX for seamless integration between Python and MQL5.
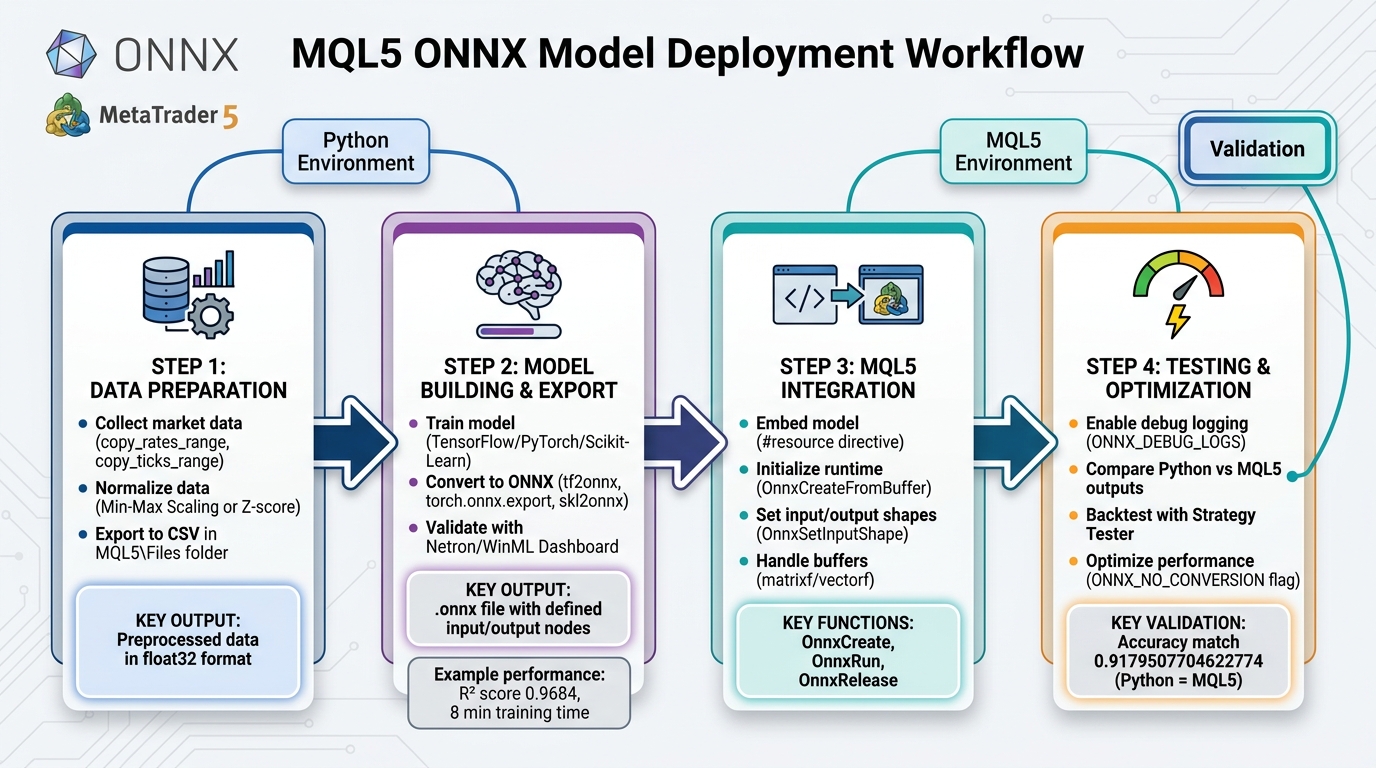
4-Step ONNX Model Deployment Workflow for MQL5 Trading
Step 1: Preparing Data for ONNX Models in MQL5

Collecting Market Data with MetaTrader 5

To get started, use the MetaTrader 5 Python module to gather historical market data. First, install the module using pip, then connect to your MetaTrader 5 terminal with mt5.initialize(). Once connected, you can retrieve historical data using functions like:
copy_rates_range: Extract bars within a specific date range.copy_rates_from_pos: Fetch bars starting at a particular index.copy_ticks_range: Obtain high-frequency tick data.
After fetching the data, convert it into a Pandas DataFrame using pd.DataFrame(eurusd_rates). This makes it easier to clean, process, and select features like Open, High, Low, and the target variable (e.g., Close price or price direction). Save the prepared data as CSV files in the MQL5\Files folder, ensuring seamless access for your terminal.
With the data collected and structured, the next step is to normalize and preprocess it.
Data Normalization and Preprocessing
Normalizing market data is crucial for improving model performance and ensuring faster convergence. Two common techniques are:
- Min-Max Scaling: Maps data to a range like 0 to 1, ideal for neural networks using activation functions like Sigmoid.
- Standardization: Applies Z-score normalization using the data’s mean and standard deviation, which works well for algorithms sensitive to data scale, such as SVM.
Save the normalization parameters (e.g., scaler.min_ and scaler.scale_) to a separate CSV file. This allows your MQL5 Expert Advisor to apply the same scaling parameters to live market data, maintaining consistency between training and testing phases. As highlighted in the MQL5 documentation:
Using the same scaler ensures the model consistently sees data during both training and testing, leading to more reliable and interpretable results.
For time-series models like LSTM, reshape your dataset from 2D to 3D tensors. The dimensions should reflect batch size, time steps, and features. Also, ensure all data is in the float32 format, as ONNX models require this, and it aligns with MQL5's matrixf type.
Once preprocessing is complete, you’re ready to export the data for training.
Exporting Data for Model Training
Save the preprocessed data as CSV files in the MQL5\Files folder. Use filenames like eurusd_training_data.csv for feature data and scaler_params.csv for normalization parameters. This shared folder allows both Python scripts and MQL5 programs to access the files without path issues.
Before moving to the training phase, double-check that your data dimensions align with the ONNX model's input requirements. Many models support variable batch sizes (indicated by -1), so explicitly define these dimensions later using the OnnxSetInputShape function in MQL5. Proper preparation here minimizes the risk of "invalid parameter size" errors during deployment.
sbb-itb-3b27815
Step 2: Building and Exporting ONNX Models
Training Models in Python
First, pick a framework that aligns with your trading task. TensorFlow/Keras is great for deep learning models like CNNs and LSTMs, while PyTorch excels in research-heavy projects with dynamic computation graphs. For more traditional machine learning tasks like classification or regression, Scikit-Learn is a solid choice. To avoid dependency issues, set up a virtual environment and include libraries like onnx, tf2onnx, and onnxruntime.
Train your model using the preprocessed data from Step 1. For instance, a CNN-LSTM model trained on EURUSD H1 data for 300 epochs took roughly 8 minutes (467 seconds) on an NVIDIA GeForce RTX 2080 Ti and achieved an impressive R² score of 0.9684. While training, make sure to define clear input and output names. These will come in handy later when setting shapes in MQL5 using OnnxSetInputShape and OnnxSetOutputShape. Once your model is trained, you’re ready to export it for use in MQL5.
Converting Models to ONNX Format
After training, the next step is to export your model to ONNX format. Use the appropriate tool based on your framework:
- TensorFlow/Keras: Use
tf2onnx.convert.from_keras(model, output_path=path). - PyTorch: Leverage the built-in
torch.onnx.exportfunction. Be sure to specifyinput_names,output_names, anddynamic_axesfor handling variable batch sizes. - Scikit-Learn: Convert models using the
skl2onnxlibrary with theto_onnxfunction.
During conversion, set the target_opset version to ensure compatibility with ONNX Runtime in MetaTrader 5. After exporting, validate the .onnx file using tools like Netron or WinML Dashboard. These tools allow you to inspect the input and output nodes and verify shapes before moving forward. Keep in mind that while most Scikit-Learn models (like RandomForestClassifier, SVC, and LogisticRegression) convert smoothly, some models, such as DummyClassifier, may encounter issues during conversion.
Organizing ONNX Files for MQL5
Once your model is converted, it’s time to organize the ONNX files for integration with MQL5. Save the .onnx files in the MQL5\Files directory so they can be easily accessed using OnnxCreate. For better structure, you might want to create a subfolder, such as MQL5\Files\ONNX Models. Use Python’s terminal_info.data_path to programmatically determine the correct path for saving files.
To make your Expert Advisor (EA) self-contained and eliminate the need for external files, embed the model as a resource with the #resource command:
#resource "\\Files\\ONNX Models\\model.onnx" as uchar ExtModel[]
Don’t forget to recompile your EA every time you update the model. Also, save any normalization parameters (like scaler.min_ and scaler.scale_) in the same directory. This ensures your MQL5 code applies the same preprocessing to live market data as was used during training.
Uso do ONNX no MT5 e MQL5
Step 3: Integrating ONNX Models with MQL5
Once your ONNX files are organized, the next step is integrating them into your Expert Advisor (EA) for real-time predictions.
Embedding ONNX Files in MQL5
To make your EA self-contained, embed the ONNX model directly using the #resource directive. This eliminates the need for external files. Add the following line at the top of your MQL5 code:
#resource "\\Files\\ONNX Models\\model.onnx" as uchar ExtModel[]
This embeds the .onnx file as a uchar array within the compiled executable. If you update the model, you’ll need to recompile the EA to apply the changes. Alternatively, you can load the model dynamically from the MQL5\Files folder using the OnnxCreate function.
Initializing the ONNX Runtime in MQL5

After embedding the model, initialize it within the OnInit() function using OnnxCreateFromBuffer. This function uses the embedded uchar array as its source. It returns a long handle, which you’ll reference for subsequent operations. Once the session is active, set the input and output tensor shapes using OnnxSetInputShape and OnnxSetOutputShape. Many models feature undefined dimensions (noted as -1), so you’ll need to set the batch size to 1 for real-time trading.
If initialization fails, the function will return INVALID_HANDLE. Use GetLastError() to diagnose the issue. For more detailed troubleshooting, enable the ONNX_DEBUG_LOGS flag during creation to output detailed logs in the terminal. Always remember to release resources by calling OnnxRelease in the OnDeinit() function to close the session and free memory.
Once the runtime is initialized, you can move on to setting up the input and output buffers for inference.
Handling Input/Output Buffers
Accurate predictions depend on properly prepared input and output buffers. If your ONNX model expects float32, use matrixf or vectorf for the buffers. This avoids the overhead of automatic data type conversions and allows you to enable the ONNX_NO_CONVERSION flag in OnnxRun() for better performance.
Ensure that your input buffer contains market data normalized with the same parameters (e.g., Min/Max scaling or Z-score standardization) used during the model's training. The output buffer will hold normalized predictions, which you may need to transform back into actionable price levels or class data. To enhance performance, define these buffers as static in the OnTick() function or as class members to minimize memory reallocation. If OnnxRun() fails to execute properly, check for buffer size mismatches using GetLastError().
| Function | Purpose |
|---|---|
OnnxCreateFromBuffer |
Loads a model from an embedded uchar array resource |
OnnxSetInputShape |
Defines the dimensions of the input data (Batch, Steps, Features) |
OnnxRun |
Executes the model inference using the provided input/output buffers |
OnnxRelease |
Terminates the model session and releases memory |
The MetaTrader 5 terminal automatically determines whether to use the CPU or GPU through the ONNX Runtime Execution Provider, so there’s no need to manually configure hardware acceleration. With the model and buffers ready, you can now test and refine your EA’s predictions using historical data.
Step 4: Testing and Optimizing ONNX Models in MQL5
After integrating your ONNX model, it’s crucial to verify that it provides accurate and efficient inferences before you dive into live trading.
Testing ONNX Model Integration
Start by enabling debug logging to monitor the model's behavior. You can use the ONNX_DEBUG_LOGS or ONNX_LOGLEVEL_INFO flag with the OnnxCreateFromBuffer function. This will generate detailed logs in the MetaTrader 5 terminal, helping you identify potential issues like mismatched tensor shapes or incorrect data types early on.
To ensure accuracy, compare the model's outputs in Python and MQL5. Run the same dataset through the model in both environments and analyze the results. For example, in one test, an LSTM model achieved an identical accuracy score of 0.9179507704622774 in both Python and MQL5 when the data was correctly normalized. If the outputs differ, double-check the normalization parameters to ensure they align across platforms.
"The purpose of ONNX is to get a machine learning model built in one language to function well if not the same in the other language... the accuracy and precision it provides [in Python] should be nearly the same one that will be provided in... MQL5." - MQL5 Articles
Use functions like OnnxGetInputTypeInfo and OnnxGetOutputTypeInfo to confirm that your tensor shapes and data types match the model's requirements. For models predicting directional price movements, you can implement a counter in the OnTick() function to compare predicted price changes with actual movements. Display the success percentage in the OnDeinit() function to evaluate prediction accuracy. Once you're satisfied with the integration's accuracy, move on to testing the model's performance with historical data.
Backtesting with Historical Data
Backtesting is the next step to assess how well your model performs under real-world conditions. MetaTrader 5's Strategy Tester is a powerful tool for this, allowing you to validate your model on historical data without requiring external software. Make sure to manage the ONNX session lifecycle properly by initializing it in OnInit() and releasing it in OnDeinit().
For models that make predictions on a per-bar basis, include a new bar check in the OnTick() function. This avoids redundant calculations for every tick, significantly speeding up the backtesting process. Also, ensure you're using the same scaling parameters (e.g., min/max or mean/std) that were applied during model training in Python. This consistency is essential to maintain numerical stability.
To track performance, you can set up internal counters to calculate the ratio of successful predictions to total predictions. For instance, a CNN-LSTM model tested in MQL5 achieved an impressive R² score of 0.9684 for financial time-series forecasting. If your backtesting results fall short of expectations, revisit your data normalization and tensor shapes to identify any discrepancies.
Optimizing Model Performance
Once your model passes the integration and backtesting phases, focus on optimizing its performance. Use data types that align with your model's requirements. For instance, replace double-precision arrays with matrixf and vectorf types to match the float32 format commonly used in ONNX models. This reduces conversion overhead and improves efficiency. Additionally, leverage runtime flags like ONNX_NO_CONVERSION, ONNX_GPU_DEVICE_0, and ONNX_ENABLE_PROFILING to enhance execution speed and pinpoint bottlenecks.
You might also consider dimensionality reduction techniques, such as Principal Component Analysis (PCA), to streamline your input features. Reducing the dimensionality can speed up both training and inference while mitigating the risk of overfitting. For real-time trading, always set the batch size to 1 when defining shapes, as this minimizes latency for single-tick predictions.
"The ability to export and import AI models in ONNX format streamlines the development process, saving time and resources when integrating AI into diverse language ecosystems." - MegaJoctan, Author
Conclusion
Recap of ONNX Deployment Process
Deploying ONNX models in MQL5 connects Python's AI capabilities with the trading execution power of MetaTrader 5. The process starts with gathering and normalizing market data, followed by building models using frameworks like TensorFlow or PyTorch. These models are then converted to ONNX format using tools such as tf2onnx. Once converted, the .onnx file is embedded as a resource in your Expert Advisor. From there, you initialize the model using functions like OnnxCreate or OnnxCreateFromBuffer and validate it through backtesting. This workflow simplifies the integration of AI into trading, making it efficient and effective for developing advanced trading strategies.
Benefits of Using ONNX Models in MQL5
Integrating ONNX models into MQL5 allows traders using platforms like Traidies to bring sophisticated AI models into their automated strategies, improving decision-making in real time. Instead of building complex algorithms from scratch, traders can use established machine learning libraries to deploy models that uncover patterns traditional indicators might miss. These models have shown strong predictive accuracy in financial market analysis.
The combination of Python’s advanced AI tools for training and MQL5’s rapid execution and validation within the Strategy Tester creates a seamless development process. This eliminates the need for additional third-party tools while maintaining precision. As highlighted in an MQL5 article:
With the MQL5 language, you can implement an ONNX model in a trading strategy and use it along with all the advantages of the MetaTrader 5 platform for efficient operations in the financial markets.
Platforms like Traidies enable traders to quickly transform well-developed trading strategies into automated bots, integrating advanced AI seamlessly within the MetaTrader 5 ecosystem to enhance trading automation.
FAQs
How can I ensure my ONNX model’s input and output shapes match in MQL5?
To ensure your ONNX model’s input and output shapes align correctly in MQL5, you’ll need to use specific functions to verify and configure them. Start by identifying the number, names, and types of the model’s inputs and outputs. Once you have this information, define the correct shapes using the appropriate functions provided by MQL5.
After setting the shapes, always check the return values or error messages to confirm the process was successful. This step is crucial because properly matching the shapes not only minimizes inference errors but also ensures the model runs smoothly and remains compatible with your implementation.
Why do my predictions differ between Python and MQL5?
Prediction differences between Python and MQL5 often stem from how ONNX models manage input/output shapes, data preprocessing, or data types. In MQL5, you need to explicitly define input and output shapes and ensure that data preprocessing aligns perfectly with what’s done in Python. Also, variations in numerical precision or hardware environments can lead to inconsistencies. Double-check shapes, data types, and preprocessing steps to reduce these differences.
Should I embed the .onnx file as a resource or load it from MQL5\Files?
When working with .onnx files, it's better to load the file from the MQL5\Files directory rather than embedding it as a resource. By using the OnnxCreate function to read the model directly from the file, you make management easier and follow standard practices. This approach is particularly useful when dealing with larger models or multiple deployments.