Debugging MQL5 Backtests: Step-by-Step Guide

Debugging MQL5 Backtests: Step-by-Step Guide
Debugging MQL5 backtests ensures your trading strategy works as intended before risking real money. This process involves checking tester setups, historical data, and code for errors that might distort results. Key steps include:
- Verify Strategy Tester Settings: Ensure correct symbols, timeframes, tick modeling modes, and spreads are configured.
- Check Historical Data: Confirm data integrity and sync broker-specific settings to avoid inaccuracies.
- Review Code for Errors: Use MetaEditor to resolve compile-time errors, runtime issues, and logical flaws.
- Analyze Trade Logic: Debug entry/exit conditions, lot sizing, and broker compatibility using visual tests.
- Validate Fixes: Rerun backtests with consistent settings and analyze metrics like Profit Factor and Drawdown.
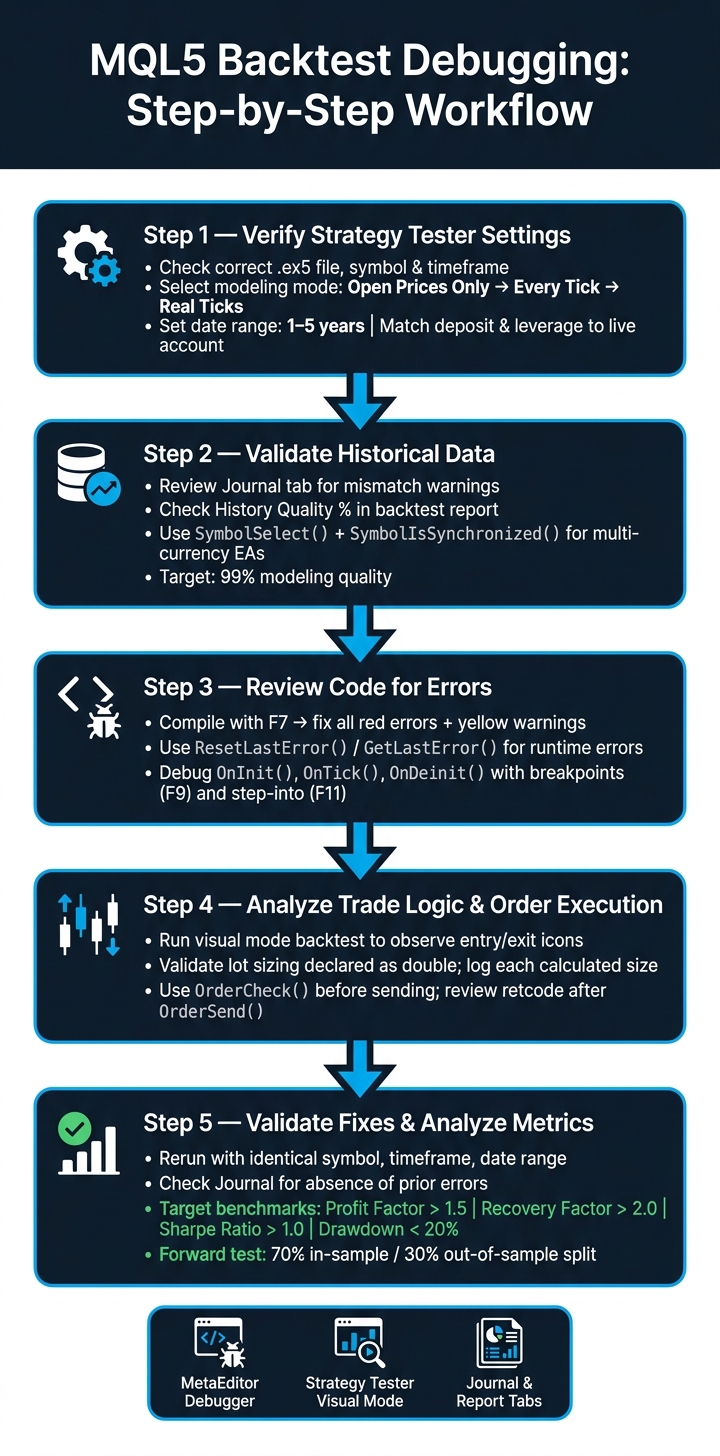
MQL5 Backtest Debugging: Step-by-Step Workflow
How to Backtest Metatrader 5 (MT5) - The Ultimate Guide for 2025
sbb-itb-3b27815
Backtest Setup Checks
Getting your tester settings right is a crucial first step in debugging backtests. Many poor results trace back to simple configuration errors - issues that are often overlooked but easy to fix.
"The biggest lie in retail systematic trading is a beautiful equity curve from a misconfigured Strategy Tester." - Ryo Nakata, EA Developer
How to Verify Strategy Tester Settings
Before running your backtest, go through these key settings:
-
Expert Advisor selection
Double-check that the correct.ex5file is chosen from the dropdown. The file must be compiled and located in theMQL5/Expertsfolder to appear in the list. -
Symbol and timeframe
Match the symbol and timeframe to the design of your Expert Advisor (EA). -
Modeling mode
Use the table below to select the right mode for your strategy:
Start with Open prices only for basic logic checks, progress to Every tick for detailed testing, and use Every tick based on real ticks for final validations.Modeling Mode Accuracy Speed Best Use Case Every tick based on real ticks Highest Slowest Final validation, scalping, tight stop/limit orders Every tick High Moderate Day trading, swing trading, parameter comparison 1 minute OHLC Moderate Fast Initial screening, rough durability checks Open prices only Lowest Fastest Quick health checks for strategies using bar open -
Date range
Set a custom period covering at least 1–2 years (preferably 3–5 years) to include a variety of market conditions - trending, ranging, and volatile. -
Deposit and leverage
Align these settings with your live trading account. For instance, EU-regulated brokers often use 1:30 leverage, while offshore accounts may use 1:500. -
Visual Mode
Turn on Visual Mode for debugging. Watching trades play out on the chart can quickly reveal issues with entry/exit logic or stop placement.
Once these settings are confirmed, you’ll be better prepared to tackle common setup errors.
Common Setup Mistakes and How to Fix Them
Even with correct parameters, certain pitfalls can derail your backtest:
-
Switching modeling modes
Changing modes can dramatically alter results. The strategy itself doesn’t change, but the simulation accuracy does. -
Using the Current spread setting
This setting applies the spread at the moment you run the test, which isn’t realistic for longer tests. Instead, manually set a constant spread - 5–10 points for EURUSD is a good baseline. -
Symbol name mismatches
If your EA uses"EURUSD"but your broker appends a suffix like"EURUSD.pro", the EA might not function properly. For multi-currency EAs, open a chart for each symbol via the Market Watch panel’s Show All option to ensure historical data is downloaded. -
Missing tick history
Missing data can lead to inaccurate backtests. Make sure all required historical data is available before running your test.
Finally, always review the Journal after each test. Look for errors like "invalid stops" or "not enough money", which can explain why trades didn’t execute or why results were unexpected.
Data and Symbol Validation
Even with a well-configured Strategy Tester, poor or incomplete data can skew your backtesting results. A seemingly accurate backtest might actually rely on price history riddled with gaps, mismatched ticks, or broker-specific quirks that don’t reflect actual market conditions. Here's how to ensure your historical data and symbol settings are reliable.
How to Check Historical Data Integrity
After running a backtest, take a close look at the Journal tab in the Strategy Tester. This log will flag "mismatch" warnings if tick data doesn’t align with M1 bars. Also, pay attention to the History Quality percentage in the backtest report. This score evaluates the consistency of M1 data - low percentages often indicate missing bars or time gaps, which can distort your results.
"History Quality is mainly a proxy for how consistent your price history is (especially M1). A higher number often means 'data is more complete,' but it does not guarantee accurate profits." - Tetsushi O-nishi, EA Developer
Keep in mind, if you’re using Open prices only mode, the History Quality will often display 0%. This doesn’t mean the data is flawed; it simply means the metric doesn’t apply in that mode. For a meaningful quality reading, run your tests in Every tick or Every tick based on real ticks mode.
To ensure your terminal downloads complete historical data before testing, you can manually open charts for all symbols your EA uses and scroll back as far as possible to sync with the broker’s server. For multi-currency EAs, add SymbolSelect() in your OnInit() function to explicitly request history for all necessary symbols. Use SymbolIsSynchronized() to confirm that your local data matches the trade server.
In Every tick based on real ticks mode, MT5 cross-checks ticks against the M1 bar. According to MQL5 documentation: "If a mismatch is detected, all ticks corresponding to this minute bar are discarded. Generated ticks are used instead." Check the Journal for any fallback to generated ticks - this could indicate that your "real tick" test isn’t as accurate as you’d like.
Once you’ve verified data integrity, the next step is to ensure the symbol settings align with your broker’s conditions.
Symbol Properties and Broker-Specific Settings
Even with clean data, the symbol’s contract specifications can impact how your EA performs during testing. Factors like spreads, swap rates, margin requirements, tick size, and volume limits vary across brokers. If your EA is tuned for one broker’s settings but tested with another’s data, the results might be misleading.
The Strategy Tester always assumes spreads are floating during a test, and SymbolInfoInteger(symbol, SYMBOL_SPREAD_FLOAT) will always return true. If the historical data contains a spread of zero or less, the tester defaults to the last valid spread. This is especially relevant when testing older data, where spread records might be incomplete.
Key symbol properties to validate include:
- Trading Conditions: Spreads, swaps, margin requirements, and order execution modes.
- Contract Specifications: Price accuracy (digits), tick size, and volume limits.
- Session Rules: Start and end times for trading and quoting sessions.
- Order Rules: Pending order expiration policies and minimum stop distances.
For multi-currency strategies or when your deposit currency differs from the symbol’s profit currency, make sure historical data for relevant conversion pairs - like EURUSD or USDCHF - is fully loaded. Without this data, the tester won’t be able to calculate margin and profit accurately.
Code-Level Error Review
Once you've confirmed your data and symbol settings, the next step is to dive into the code itself. This review focuses on uncovering hidden logic or runtime issues that may not be apparent during initial setup checks. Even the most well-designed Expert Advisor (EA) can harbor bugs that only show up during a backtest. Thankfully, the MQL5 Editor offers two powerful tools for error detection: compile-time checks and runtime debugging.
Using the MQL5 Editor and Compiler
To compile your EA, press F7. The compiler will scan your code and identify two types of issues:
- Errors: These are critical (highlighted in red) and must be resolved before the code can compile.
- Warnings: These appear in yellow and allow the code to compile but highlight potential logic problems.
For example, mistakenly using = instead of == in a conditional statement is a common issue. While the code will run, the logic won't work as intended, potentially skewing your backtest results.
Don't ignore warnings - they often point to type mismatches or unintended assignments that could lead to inaccurate results. Once your code compiles cleanly, you can press F5 to debug live or Ctrl+F5 to simulate historical market conditions.
Debugging Runtime Errors
After resolving compile-time issues, the next step is to address runtime errors. These errors don't show up during compilation but appear when the code is executed. Common examples include division by zero, accessing an array out of bounds, or failed trade requests. When such errors occur, MetaTrader 5 (MT5) stores an error code in the _LastError variable.
"Each MQL5 statement can trigger a runtime error; immediately assess
_LastErrorafter critical operations as subsequent actions may overwrite its value." - MQL5 Programming for Traders
To handle these errors effectively:
- Use
ResetLastError()before the operation you want to monitor. - After the operation, call
GetLastError()to capture the error code. - Convert the numeric error code into a readable format using
EnumToString()for better clarity.
During backtests, all Print() outputs and error messages are logged in the Journal tab of the Strategy Tester. Remember, the Experts tab is reserved for live execution logs.
Reviewing Key EA Functions
Once compile-time and runtime errors are resolved, it's time to examine the core functions of your EA for logical issues. Pay special attention to the following functions: OnInit(), OnTick(), and OnDeinit().
-
OnInit(): This function initializes your EA by setting up indicator handles, validating input parameters, and defining global variables. If initialization fails and the function doesn’t returnINIT_FAILED, the EA might continue running in an unstable state. To avoid this, set a breakpoint at the start ofOnInit()and use the Watch window to verify all handles and variables before proceeding. -
OnTick(): Since this function executes on every price change, even small logic errors can multiply quickly. Issues in entry conditions or lot size calculations often occur here. Use F11 to step into the function's logic and F10 to skip over verified sections. AddPrint()statements with__FUNCTION__to track variable values and identify errors in complex workflows. -
OnDeinit(): This often-overlooked function ensures proper cleanup when the EA stops running. Failing to clean up here can leave file handles open or graphical objects lingering on the chart. After stopping a backtest, inspect the chart for leftover objects and review logs for unclosed resources.
| Function | What to Check | How to Validate |
|---|---|---|
| OnInit | Indicator handles, input validation, variable setup | Use breakpoints; verify the return code (INIT_SUCCEEDED vs. INIT_FAILED) |
| OnTick | Entry/exit logic, price calculations, order conditions | Use Print() statements with __FUNCTION__; monitor the Watch window during visual backtests |
| OnDeinit | Object deletion, file handles, dynamic array cleanup | Inspect charts after testing; check logs for unclosed resources |
Trade Logic and Order Execution Checks
Once you've ensured data integrity and fixed any code errors, the next critical step is confirming that your trading logic and order execution work exactly as intended. After resolving compile-time and runtime issues, it's time to evaluate whether your Expert Advisor (EA) performs as expected during live or simulated trading.
Debugging Entry and Exit Logic
To fine-tune your EA, run backtests in visual mode. This allows you to observe trade icons, indicator overlays, and how the EA reacts to market conditions. Use debugging tools like breakpoints (F9), step-into (F11), and the Watch window to monitor key variables in real time. Additionally, the Comment() function can display key logic states directly on your chart during visual backtests. For example:
Comment("Trend: UP | RSI: 68")
Make sure to set your tick modeling mode to Every tick based on real ticks. This option ensures your conditions respond to actual historical price movements rather than simplified approximations, providing a more accurate testing environment.
Finally, validate that lot sizing and risk calculations are consistent and error-free to avoid unexpected behavior during execution.
Checking Lot Sizing and Risk Calculations
To prevent rounding errors, declare lot sizes as double and log each calculated size for review. This ensures precision and consistency in your calculations. Analyze the Orders and Deals tabs to identify any unexpected changes in trade volume. Additionally, monitor the gap between Equity and Balance Drawdown to detect potential risk mismanagement issues.
Order Execution and Broker Compatibility
Even with flawless trade logic, broker-specific constraints can disrupt order execution. Before placing an order, use OrderCheck() to validate your MqlTradeRequest. After sending an order with OrderSend(), review the retcode for errors like "invalid stops" or "invalid volume". Adjust your parameters as necessary - leveraging SymbolInfoDouble() to retrieve broker-specific data - to ensure compliance with their requirements. Also, account for historical spread variations by setting an appropriate deviation (slippage) parameter.
| Tick Generation Mode | Accuracy | Best Use Case |
|---|---|---|
| Every Tick | High | Strategies relying on intra-bar price movements |
| 1 Minute OHLC | Medium | Strategies that don't require intra-minute precision |
| Open Prices Only | Low | Quick evaluation of bar-open-only strategies |
| Real Ticks | Highest | Maximum realism using actual broker tick data |
Validation and Re-Test Process
Once you've made fixes, the next step is to confirm they actually work.
How to Rerun Backtests for Validation
To validate your fixes, rerun the backtest using the exact same symbol, timeframe, and date range that originally caused the error. Consistency is key - changing these variables could skew the results.
Take testing further by using stricter modeling modes. Start with Open Prices Only, then move to Every Tick, and finally to Every Tick Based on Real Ticks. If your fix holds up across all three modes, it's a good sign. However, if the strategy fails in a more precise mode, it might indicate that the fix relied on synthetic price patterns rather than addressing the root issue. Before running your final validation, update your data in the History Center (F2) to ensure you're working with 99% modeling quality.
Analyzing Logs and Performance Metrics
After each re-test, check the Journal tab. Look for the absence of previous runtime errors like "array out of range", "zero divide", or "invalid handle". While a clean log doesn't guarantee perfection, it does confirm that specific errors have been resolved.
Next, head to the Report tab and compare the updated metrics to those from the buggy run. Pay close attention to these three critical metrics:
| Metric | Calculation | Target |
|---|---|---|
| Profit Factor | Gross Profit / Gross Loss | > 1.5 |
| Recovery Factor | Net Profit / Max Drawdown | > 2.0 |
| Sharpe Ratio | Risk-adjusted return | > 1.0 |
A Profit Factor above 1.5 and a Drawdown below 20% are strong indicators that the fix has improved the strategy's logic. Lastly, check the Graph tab for a smooth equity curve. If the curve looks erratic, it could signal unresolved issues with execution.
Make sure these metrics meet the benchmarks before considering the debugging process complete.
Building a Debugging Checklist
After each session, confirm the following:
- Compilation and Data Quality: Ensure the code compiles without errors in Release mode and that the History Center shows 99% modeling quality.
- Journal Review: Verify that no critical runtime errors appear in the Journal or Experts tabs.
- Metric Comparison: Confirm that Profit Factor, Recovery Factor, and Drawdown meet the target benchmarks.
- Visual Confirmation: Use visual mode to check that entries, exits, and graphical objects behave as expected.
- Forward Testing: Test the EA on an out-of-sample period (e.g., 70% in-sample and 30% forward split) to confirm the strategy isn't curve-fitted.
"Data doesn't lie. Backtesting in MT5 allows you to rigorously test strategies on historical data, revealing their true edge before risking real capital." - Saeid Soleimani
For those frequently working with MQL5 strategies, tools like Traidies can streamline the process. Automated backtesting with historical data saves time, allowing you to focus on validating the strategy itself instead of troubleshooting setup errors.
Conclusion
Refining your MQL5 backtesting process requires a mix of strategic insight and the right tools. Let’s recap the essentials to ensure your approach is both efficient and effective.
Key Takeaways for Debugging MQL5 Backtests
Debugging in MQL5 is a multi-step process that demands attention to detail at every stage. Start with compilation (F7) and address not just errors but also warnings, as these can mask subtle logic issues that might cause silent failures. Once your code is clean, use runtime debugging with breakpoints and step-by-step execution to catch problems that emerge only under specific market scenarios.
Another cornerstone of reliable backtesting is high-quality data. Achieving 99% modeling accuracy and validating with Every Tick mode ensures your backtests closely mimic real market behavior. To go further, forward testing on out-of-sample data provides an extra layer of validation, proving your strategy’s viability beyond the development phase.
"The reproducibility of a problem in the program is a necessary condition for fixing it afterward." - MQL5 Programming for Traders
By consistently cycling through compiling, debugging, data validation, and reviewing logs, you create a more dependable Expert Advisor (EA).
Tools That Can Speed Up the Debugging Process
Leveraging the right tools can make a world of difference in streamlining your debugging workflow.
Built-in tools like the MetaEditor debugger, Strategy Tester visual mode, and the Profiler address most debugging needs directly within MetaTrader 5. For those looking to save time, platforms like Traidies offer automated backtesting with historical data. This eliminates much of the repetitive setup, allowing you to focus on refining your strategy logic.
"Debugging is an indispensable skill for any MQL5 developer. Algorithmic trading strategies are complex systems, and even minor errors in code can lead to significant financial losses." - Trading Strategies Academy
FAQs
Why does my backtest look great but fail in live trading?
When your backtest shows promising results but falls short in live trading, several factors could be at play. Issues like slippage, unexpected disconnections, or sudden volatility spikes often aren't fully captured in backtests. Another common pitfall is overfitting strategies to historical data, which can lead to underperformance in real-world conditions.
On top of that, biases such as survivorship bias or overly optimistic assumptions about fees and liquidity can artificially boost backtest performance. To bridge the gap between backtesting and live trading, focus on simulating realistic market conditions and steer clear of over-optimizing for past data.
How can I tell if my MT5 historical data is missing or wrong?
To determine if your MT5 historical data is incomplete or inaccurate, start by checking the data for your specific symbol and timeframe. Navigate to View > Symbols > Bars in MT5, choose your symbol, and ensure the data is available. If you encounter errors like "No History Data" in the Strategy Tester, it often points to missing or corrupted files. Make sure your historical data is correctly imported and current to ensure reliable backtesting results.
What’s the fastest way to find where my EA logic breaks in a backtest?
To quickly pinpoint where your Expert Advisor (EA) logic might be going wrong during a backtest, you’ll want to make use of the debugging tools in MetaEditor. Here’s how you can approach it:
- Set breakpoints at key sections of your code where you suspect issues might arise.
- Run the backtest in debug mode, allowing you to closely monitor the execution process.
- Step through the code line-by-line to observe how it behaves in real time.
By keeping an eye on variable values and the call stack, you can efficiently trace and resolve errors or unexpected behaviors in your EA logic.